How French Drains Solve Yard Drainage Problems?
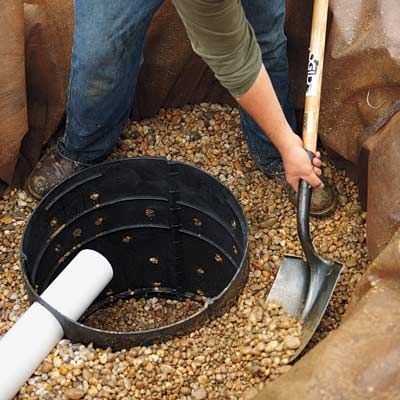
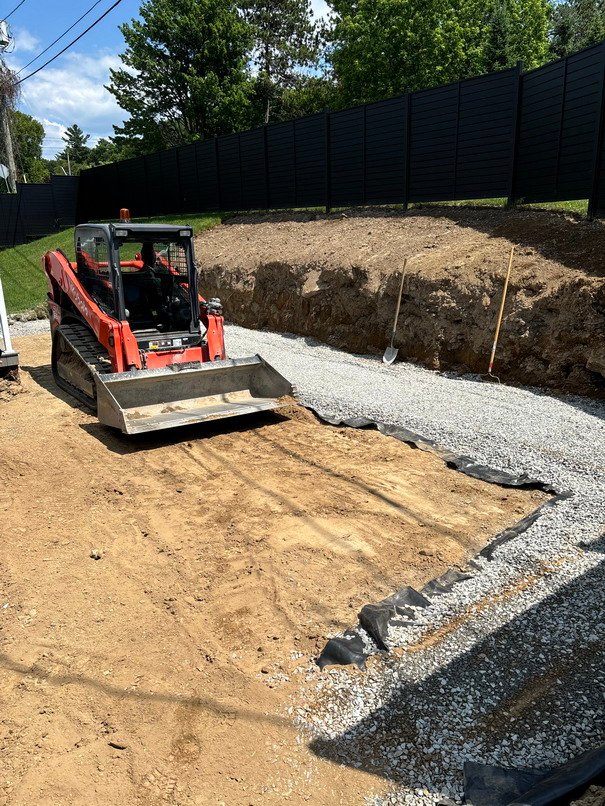
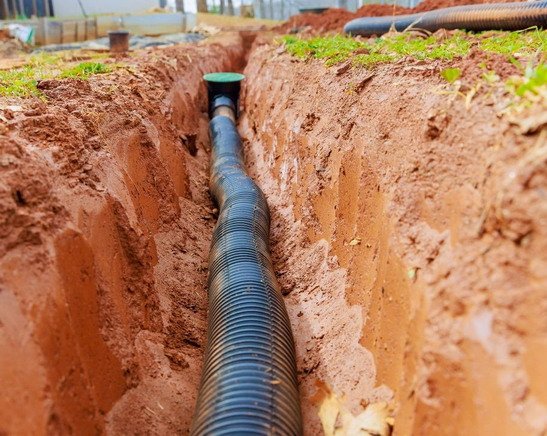
How French Drains Solve Yard Drainage Problems? When rainstorms leave your yard with standing water or persistently soggy soil, it’s a clear sign of a drainage problem. These issues can make your outdoor space difficult to enjoy and even lead to damage on your property. Water that doesn’t drain properly tends to collect in low spots or near your home, creating a variety of challenges. If not addressed, these problems can escalate over time, affecting everything from your landscaping to the foundation of your house. Effective drainage is important for moving water away from areas where it could cause damage. Without it, excess water can erode soil, harm plants, and attract mosquitoes. Addressing these issues protects your property while ensuring your outdoor space remains usable and inviting. Common yard drainage issues Yard drainage problems come in many forms. Some of them are Standing water that lingers after storms Soggy, swampy soil that hinders lawn and plant growth Erosion that strips away topsoil, leaving bare patches Blocked drains, compacted soil, or improper grading that impedes water flow Unresolved drainage issues that can escalate, ruining the yard Why is proper drainage important? Proper drainage is critical to maintaining a safe and functional outdoor space. When water doesn’t drain correctly, it can seep into your home’s foundation, causing cracks and structural damage. It can also flood basements, leading to costly repairs. Beyond the structural risks, poor drainage can damage your landscaping by drowning plants and grass or washing away soil. By improving drainage, you not only safeguard your property but also make your outdoor space more enjoyable. Whether you’re hosting a backyard barbecue or planting a garden, proper drainage keeps your yard in good condition. What Is a french drain system? A French drain is essentially a trench filled with gravel and a perforated pipe that redirects water. Installed underground, it collects surface water or groundwater and moves it to a safe discharge point, such as a storm drain or a low-lying area. The concept is simple yet highly effective, making it a popular choice for homeowners in Fredericton, NB dealing with excess water. How do french drains work? French drains are an effective drainage system designed to redirect excess water away from problem areas. The process begins with digging a trench around the affected zone, typically sloping downward towards a suitable discharge point such as a storm drain or lower section of the yard. This trench is then filled with a layer of gravel, upon which a perforated pipe is installed. The perforated pipe is the critical component of the system, as it allows water to enter while preventing soil from clogging the drainage pathway. A landscape fabric lining is added to the trench to further protect the gravel and pipe from becoming obstructed by dirt and debris. Finally, the trench is back-filled with additional gravel and topped with topsoil. The key principle behind the French drain’s functionality is the interplay between gravity and permeability. As water accumulates in the problem area, it seeps into the gravel and enters the perforated pipe. The pipe then transports the water away from the problem site, redirecting it to a location where it can safely disperse, such as a drainage ditch or rain garden. This simple design leverages natural processes to effectively manage excess water and prevent issues like waterlogging, erosion, and foundation damage. By strategically positioning the French drain system, homeowners can proactively address moisture-related problems and maintain the integrity of their property. Materials used in french drain system To build a French drain, you will need materials like perforated pipe, gravel, and drainage fabric. The gravel helps filter water into the pipe while supporting the trench structure. The fabric prevents soil from clogging the system, ensuring that water flows freely. These components work together to create a drainage system that effectively handles excess water. How french drain can solve drainage issues? Prevent water accumulation French drains prevent water accumulation by giving excess water a direct path to follow. Instead of pooling on your lawn, water flows through the gravel and pipe, draining away from your yard. This helps eliminate soggy spots and standing water, improving the overall health and appearance of your outdoor space. Protect your home’s foundation By directing water away from your home, French drains play a vital role in protecting your foundation. Excess water near your house can lead to cracks and long-term damage. A well-placed French drain keeps your foundation dry and intact, saving you from expensive repairs. Fix lawn waterlogging French drains can play a crucial role in preventing soggy lawns. By improving soil drainage, these systems help to address the underlying issue of excess moisture that can lead to waterlogged and unhealthy grass. With better drainage, the soil is able to absorb water more effectively, promoting healthier, greener, and more vibrant lawn growth. The strategic placement of a French drain system can make a significant difference in the overall quality and appearance of a lawn, as it helps to divert water away from problem areas and ensure the soil maintains the optimal moisture levels for lush, thriving grass. Control erosion French drains can be an effective solution for controlling erosion. By redirecting the flow of water away from problem areas, these drainage systems help to reduce the volume and velocity of water runoff. This decreased water flow, combined with improved soil drainage, helps to prevent soil saturation and the subsequent erosion that can occur when water accumulates and flows uncontrolled. French drains play a crucial role in preserving the structural integrity of the landscape and preventing the loss of valuable topsoil. Some challenges and solutions French drains can experience issues like clogs, pipe damage, or improper slope. These problems can disrupt water flow, reducing the system’s effectiveness. Inspecting your drain regularly can help identify issues early. Clearing clogs, repairing damaged pipes, and ensuring the slope is correct are common troubleshooting steps. Signs of trouble include standing water, soggy soil, or water near your home’s foundation. If